Hands On As We Grow® |
- Adorable Heart Snail Craft to Spread the Love
- Easily Make Tinted Jars with This Simple Painting Glass Jars Idea
- 30 Chinese New Year Crafts for Kids, Lanterns, Dragons, Tigers & More to Celebrate!
- 30 Fine Motor Activities for Toddlers! Pinch! Thread! Trace!
| Adorable Heart Snail Craft to Spread the Love Posted: 25 Jan 2022 06:00 AM PST Click here to read Adorable Heart Snail Craft to Spread the Love on Hands On As We Grow® Spread love this spring with an adorable and super simple pom pom and paper plate heart snail craft for toddlers and preschoolers to make.  Kat is a full time working mom in Australia with two sweet little kids! She has a five year old daughter and a new baby boy. With a full time job and commute times Kat had always found it difficult to find time to be together as a family. “Finding time to be together as a family can be quite challenging.” “Before I joined The Activity Room®️, activities very rarely happened. Mainly because I work full time. There just wasn’t enough hours in the day. I didn’t make any attempt to make there be enough hours in the day.” Kat’s daughter began showing an interest in activities due to her exposure at daycare. So Kat tried looking up activities on Google, YouTube, and Pinterest. But finding the time to do these activities along with looking for them and prepping for them was so hard. If you are struggling to find time, try these super quick prep ideas for activities at home! And give the heart snail craft a try with your little ones. It's super simple and absolutely adorable! Eating. Sleeping. Cleaning. Activities?Kat shares with us her heart on this fact and how she felt like she was failing as a mom since she didn’t know how to make activity time happen with her daughter. “I suffered a lot of mom guilt over the fact that she started going to school so early. I was working, and it was hard. I felt like I was failing as a mom, because we weren’t spending any quality time together. So that was very challenging. And trying to balance working and staying alive. Eating. Sleeping. Cleaning. It was really, really hard. I struggled with it.” Doing activities with her kids was more than just about occupying the kids. Kat wanted to make memories and connect with her children through play and focused fun. “I wanted to have time with [my kids] and create memories with them. Growing up, my mom was a stay at home mom, and she was always there for me. We did things together all the time so we built these beautiful memories that I wanted to try and replicate with my own kids. I wanted to be involved in their development. I didn’t want to just be this person in the background. So that’s what really prompted me [to do activities].” The Unfortunate Lockdown EffectNext, Covid-19 hit Australia and they went into lockdown. Suddenly, Kat found herself working from home and her daughter unable to go to daycare. This was a huge shock for all of them. She needed help to get something going to assist her daughter in the transition. “Suddenly, I was working from home. She was not able to go to daycare. And all the huge amount of activities that she did during the day with daycare came to a grinding halt. And she went nuts. She just couldn’t cope with it.” “My daughter reacted to not being able to see her friends and go to daycare like a gremlin that had water thrown over her. She went from being a really happy go lucky, bright child, to suddenly there were tantrums and tears. It was this whole big emotional whirlwind that I’m sure parents throughout the world went through. I was going insane trying to juggle finding things to keep her engaged and happy. In this horrible, chaotic time, I was getting no sleep because I was trying to work through the day and then when she was asleep, I was trying to research ideas for her and then I was trying to prep them. It was just nuts.” Discovering The Activity RoomKat discovered The Activity Room through the daycare during lockdown. “Daycare was the one who recommended looking at The Activity Room. They sent a list of things, that were really good to do. They had a learning at home pack. And then they had a list of links of things that we could look at elsewhere. And, The Activity Room was on there. That’s how I found it.” She tells us she was very excited about joining Room and could hardly believe she had finally found it! “I thought it was fantastic! Straight away. I guess the thing that’s really great about The Activity Room is the structure of it. That there is something prompting you every day.” Download the Free Sample Week for Preschoolers here! She loved how everything was planned out for her and didn’t need to take a lot of time! “I think the biggest thing I read was, just 15 minutes a day has value with your child. You’re making memories in that time. Surely I can find 15 minutes.” “I’m a very organized person, that’s how I structure my life. So having something there where it was all put together, and I could refer back to it, just seems like a godsend. Not having to spend hours researching on what to do and getting overwhelmed with all sorts of ideas. Having that [prompt] where someone told me everyday, hey, how about you try this activity? And having the alternatives, if they’re not interested in that then there’s some others. I was really excited. I thought I’d won the lottery.” “Being able to get back that time and have it set out for me really did help such a difficult time be so much easier. And we found this new hobby that could help replace some of the things that we had lost during the whole COVID period.” You can start to get back some of that time too with the simple and fun heart snail craft Kat shares with us at the end of this post! Best Tips for Working Moms and #ActivityWinsWe asked Kat what her biggest tips would be as a working mom for success with activity time. Here is what she had to share with us. Preparation Is the Key to All of the Activities“My biggest tip to share as a working mum is preparation!” “My daughter, I’m sure like a lot of children, gets very impatient if she has to wait. By the time you pull everything together, the moment is gone, she’s not interested. It has taught me to put some time aside and prep everything out. So it’s all just ready to go.” “Preparing in advance. Even if it’s half an hour on the weekend to look at what’s coming up in the week and preparing as much as possible.” Kat puts together little bins so her activities are grab and go for the week or even month. “I create little boxes for each day. I have everything together so that when we get home, we can just pull it out and it’s there. And then I always have a few backup activities that I’ve usually gotten from other members that have been posting on the Facebook page. So if she’s really interested that night, then I’ve got some more things that she can do while I’m cooking dinner.” Read Your Kids Cues“My other tip is that you have to read your kid's cues.” “Some days, she’s just not in the mood, and it’s just trying to force it. You just put that aside for another day.” “There are some days, the activity just isn’t something that interests her. Sometimes they’re a little bit too young for her now. Sometimes they’re too old, or they’re too messy. My daughter doesn’t like getting dirty so things that involve finger painting and stuff like that I struggle with her. She’s definitely better with it, but she’s not interested in that.” “The Activity Room has helped me learn about how my daughter thinks through watching how she processes the activity. And what she likes, and doesn’t like. It’s really been enlightening.” Kat added some tips to her heart snail craft below to give you an example of how she puts this into action practically in an activity. We're All Trying to Engage with Our Kids“I love the community, the Facebook community is absolutely fabulous. Being able to interact with people around the world where we’re all going through the same things. We’re all trying to engage with our kids. It’s just such a supportive environment. I found that has just been fantastic.” “I feel like I’m part of something bigger. I feel like I’m part of my daughter in particular, her life and those memories. All that mum guilt that I felt before of not being home to spend time with her has just gone away. Because every day we’re spending time doing these [activities] together. They don’t always work out but we have those moments. I feel like I’m so much more in tune with my daughter. I’m really looking forward to being able to go through that process with my son now too.”
 How many kids do you have and how old are they?2 kids. Brie who is 5 and Oliver who turns 1 in May Why do you love doing activities with your kids?Its so nice to put aside time for just fun between us. It's so easy to get caught up in daily routines of work and school that you don't get time to stop and just enjoy spending time with your kids. I also felt cheated that since going back to work full time all my kids special moments were spent with other people. I wanted to make sure we made time to create memories together. How long have you been in The Activity Room?April 2020 when Sydney went into Lockdown and I was desperate to keep my daughter entertained! What is your favorite activity you’ve done in The Activity Room?There's been so many its hard to pick but I think it's the I Love You Scavenger Hunt. Putting in words all the little things we love about our daughter and seeing how much joy they gave her. She loved searching for the notes daily and they now make up a poster she often goes back to. So simple but so meaningful. (Make sure to check out the super cute heart snail craft we made that I shared below! What’s your favorite thing to do with your kids when you get a few moments?Dancing and Singing together, carefree moments that make them giggle! What’s your best tip for doing activities with your kids?Do the prep in advance and read your kids cues. My daughter (like most kids!!) is not patient and she'd quickly lose interest having to wait while we got everything together. I found it easier to devote some time on a Sunday afternoon to prep for the whole week which meant also I can read her cues as to what she's interested in doing and be ready to go. I have choices of things we can do depending on her mood! Some days are multiple activity days and she wants more and more, others she's just not interested and that's ok too! If you were to tell a friend about The Activity Room, what would you say to them?The Activity Room has become an important part of our daily life. Before The Activity Room I thought about how nice it would be to doing crafts and activities with my daughter but never seemed to get round to doing it. I was never prepared, was too tired after a full day of work, or couldn't find the time. I always felt guilty for that. Now with The Activity Room I have a whole catalogue of easy ideas ready to go so that now my daughter will daily ask if we can do an activity and I can say yes straight away and be excited for the things we will do together. I feel I'm playing an active role in her development and creating special memories for us. I can't wait to start including my son in our games as he gets older too! Share your favorite quote"There is nothing impossible to him who will try." Alexander the Great Pom Pom Heart Snail Craft My daughter loved this heart snail craft! She got to play with different materials (she loves it when I bring out the glitter) and made something she could then go on to play with that looked "beautiful". Supplies Needed to Make Your Own Heart Snail Craft
 Before beginning the craft we talked about what we were going to make first and decided on a colour theme she wanted to go with. I had everything laid out ready to go so we could move straight to the next construction part whilst the first part was drying. I also cut the heart shape out of cardstock for her first. But, I think next time I will let her make the shell shapes to practice cutting too. How to Make a Pom Pom Heart Snail Craft with Your PreschoolersFirst fold a paper plate in half to create a crease.  Decorate the outside of your paper paper plate with paint and glitter (optional) and leave to dry Using the cardstock (or another paper plate) cut a shape to make the snails shell. We made a heart shape to make a 'Love snail' for Valentine's Day.  Decorate the shell using glue and the pom poms. For older kids you can make patterns with the pom poms on your heart snail craft like spirals or for toddlers just 'free style' it.  Cut your pipe cleaner in half. Glue eyes on to the end of the pipe cleaners to make the heart snails eyes. When everything is dry refold the paper plate and towards one end cut two little notches out of the crease to leave two small holes. Poke each end of a pipe cleaner through the holes and sticky tape them to the underside of the paper plate. Glue the snail's shell onto its body/foot. She loved her heart snail craft! I have found discussing first what we were going to do really makes her more engaged with the activity. Deciding on what colors we wanted for our craft and what materials we were going to use to decorate the heart snail really gets her 'invested' in the outcome. The activity did involve a little wait time whilst everything dried before we could assemble it. Often she will lose interest if she can't finish it all in one go but she really wanted to see how her snail came out so was happy to come back to it later when everything was fully dry. I expected her to want to do patterns with her colored pom poms but she was more into 'free styling' her decorations. She also created a personality for her snail with a little running commentary to herself about how beautiful the shell was going to look and how all the other snails were going to be amazed at it!! I loved how much fun she had with her heart snail craft and how proud she was of what she created. She and I both get a real kick out being able to create something together just the two of us. I love it that as she's growing she's showing so much independence and creativity but still asks for my input and wants it to be something we do together! Some Final Thoughts From KatWe joined when Sydney first went into lockdown and Brie could no longer go to daycare. I realized quickly she was used to getting a lot of stimulation throughout the day that she suddenly wasn't getting and it was affecting her normally bright happy personality. I was madly trying to research and prep activity ideas late into the night as the days were filled with caring for her and working from home full time! And, I was getting stressed out and exhausted. Finding The Activity Room was a godsend and we both quickly became addicted to the activities and the time together it gives us! Having that 'routine' of time for daily activities not only helped us get through a time when the world was topsy turvy but also really helped her adjust when her baby brother arrived. Because she knew that Mummy still had time to do things with her and that she was loved. It is our special time. I also love the Facebook community which is so supportive and so creative. Its amazing to think we can connect with so many families throughout the world and its been so encouraging! The Facebook group alone makes The Activity Room so worth it! As they say it takes a village to raise children! |
| Easily Make Tinted Jars with This Simple Painting Glass Jars Idea Posted: 24 Jan 2022 06:00 PM PST Click here to read Easily Make Tinted Jars with This Simple Painting Glass Jars Idea on Hands On As We Grow® Learn how to tint mason jars in this easy DIY painting glass jars tutorial! These pretty jars are the perfect DIY crafts to gift or keep! Ever seen those pretty, colorful rustic-looking mason jars and immediately wanted one? Me, too! I wanted some for a long while, even before this craft, to show off wildflowers or serve as cute organizers. Hey, my paper clips needed a space to hang out! How to Tint Glass Mason Jars with Painting for KidsAs a colorful Mother’s Day gift for Grandma, the boys and I made some tinted mason jars. Tinting glass jars is actually incredibly easy for the kids to do through painting! I first did this craft at my brother and sister-in-law’s wedding. We had so much fun doing this as a girls’ day activity for wedding prep, that I immediately started thinking of ways to turn this into a craft for kids! This is one of our 10 non-flower crafts for mom for Mother’s Day. It’s so simple that it’s quickly become a favorite! 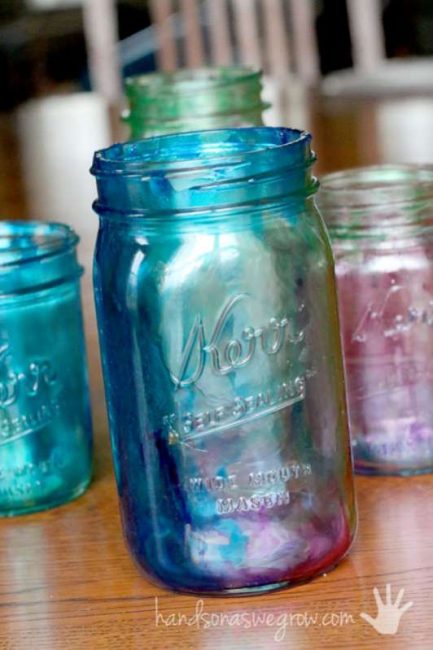 What You Need to Tint Your Glass Mason Jar With Paintings:
I love when I have everything in my supply cupboard already! Mod Podge would be the only thing I don’t have in stock all the time. This time, I did happen to have some on my shelves. But, like I mentioned, school glue works too for this, just add a bit of water to it. Easily Tint Glass Mason Jars by Painting for Cute Gifts & VasesFirst, the boys mixed their own colored glue for painting the glass jars. I dumped some Mod Podge glue into glass dishes. Then they added food coloring of their choice and stirred it up.  They got right to painting the glass jars. Paint either the inside or the outside for this craft, it doesn’t matter. Henry painted the inside of his first jar. We poured a little of the colored glue into the glass jars and swirled it around to cover the entire inside and then let it drip out. Your child can also reach inside with a paintbrush to swipe on the color. Just be sure to get all the nooks and crannies!  George painted the outside of his. To help contain the mess and prevent drips, I stuck a metal tray under the glass. He turned the glass jar upside down to paint the bottom of it. George wanted to use all three colors of glue on his jar, which is just fine. I just made sure to tell him to keep them separate on the jar or all three colors together would probably make brown. He was very careful to paint the colors next to each other and not mix them all together. This was excellent fine motor practice! Get Creative & Mix Up Your Painting TechniquesI encouraged them both to get creative and paint their glass jars with multiple colors to see them marble together.  On their second jars, they each tried painting their jar the other way. George painted the inside of this one, and Henry painted the outside of his glass jar.  How to Finish Your DIY Paint Tinted Glass JarsI think the tinted glass mason jars look the same, whether they were painted on the inside or out. However, you can feel the glue mixture on the ones that were painted on the outside. If you prefer a smooth finish, go with painting the inside. I was hesitant to have the kids do it that way, I thought it would be hard for them to reach in with the paintbrushes. But neither of them had problems. One thing that helped the boys paint all the nooks and crannies inside was that we used wide mouth glass jars. They were able to stick their hands further into the opening and had more control over paint placement.  It’s always nice to see them being creative side by side. They were even getting along. For the most part. They had a little argument over the blue paintbrushes because somehow there ended up being three of them and George thought there should only be one. Learning how to tint glass mason jars with painting was super easy!  Final Step for Paint Tinted Glass Mason JarsLet Them DripAfter the mason jars are painted, they have to drip. It’s most important for the ones that were painted on the inside. So we tipped them over to drip for awhile. We flipped them over onto sheets of aluminum foil. This made it easier to clean up later. The one good thing about the kids painting the inside of the glass jars is that I could write on the bottom of them with permanent marker the date and their initial so I knew whose was whose. We really should have let them drip for a good hour or so, but we were in a rush and it was only a few minutes. Hey, we were going to go roast hot dogs and s’mores on an open fire!  Bake at Lowest TemperatureThen I popped them in the oven at the lowest temperature I could, 175°F, for about 10 minutes. The painted glass jars were still upside down. Then I turned them over and baked them for another 20-30 minutes or so. Make sure you use oven mitts to flip the jars!  I took them out and we went to roast our hot dogs while they cooled off. They turned out so pretty with marbled coloring. I can see a few thick spots in the paint. Maybe if I let them drip for a while longer before putting them in the oven, it would be a more even coating. They still look pretty awesome though! I know that these are DIY vases that Grandma will treasure for years. I can just picture them filled with pretty flowers or stuffed with yummy candies. What would you put into your tinted mason jars? What are your favorite DIY crafts to gift? We’d love to check out your creativity! |
| 30 Chinese New Year Crafts for Kids, Lanterns, Dragons, Tigers & More to Celebrate! Posted: 24 Jan 2022 06:00 AM PST Click here to read 30 Chinese New Year Crafts for Kids, Lanterns, Dragons, Tigers & More to Celebrate! on Hands On As We Grow® It’s time to celebrate the new year! The Chinese New Year, that is, with crafts of all kinds for kids!  The Chinese New Year is a fifteen-day long celebration that takes place each year based on the moon’s phases. It often includes family visits, fireworks, parades, lanterns, dragons, a thorough cleaning of the house, and more. Join the festivities of the Chinese New Year this year with these 30 Chinese New Year crafts for kids. Xin nian kuai le! (Translation: Happy Chinese New Year!) Chinese New Year Lantern Crafts for KidsLights, camera, lanterns! The Lantern Festival is celebrated on the fifteenth day of the Chinese New Year. It signifies letting go of the past and starting fresh. Now, I just want to sing, Do you want to build a lantern? And let it go! Light your way with these Chinese New Year lantern crafts kids can make. 
Chinese New Year Dragon CraftsDragons roar to life at the Chinese New Year. They are seen as a symbol of power, strength, and luck in Chinese culture. Get your kids breathing fire with these Chinese New Year dragon crafts. 
Chinese New Year Tiger Crafts Kids can MakeRats, oxen, and tigers, oh my! Each year is assigned an animal, based on a twelve year cycle rotation. The year 2022 is considered the Year of the Tiger. Enjoy these kid's tiger crafts this Chinese New Year. They are adorable! 
Chinese New Year Noise MakersShake, rattle, and bang your way into the Chinese New Year with your kids using these noise maker crafts. Some say the loud noises scare away a monster. 
More Chinese New Year Crafts for KidsContinue the Chinese New Year celebration with these additional crafts. Which one will you try first? 
 How will you celebrate the Chinese New Year? |
| 30 Fine Motor Activities for Toddlers! Pinch! Thread! Trace! Posted: 23 Jan 2022 06:00 PM PST Click here to read 30 Fine Motor Activities for Toddlers! Pinch! Thread! Trace! on Hands On As We Grow® These fine motor activities for toddlers to do are simple and fun! As I’ve been working on the new eBooks (they’re coming out April 19, 2015), I’ve included a section of printables that showcase a slew of simple activities that cover the different types of activities we do (fine motor, gross motor, etc). The fine motor Go-To List is jam packed with ideas and I realized that so many of them can done with toddlers! They are perfect! They’re simple, easy to set up and can keep a toddler occupied for more than 10 minutes (maybe! ha ha!).  Remember my tips for doing activities with toddlers? Here they are again:
When it comes to fine motor activities for toddlers in particular, don’t think these should just be easy for toddlers to do right away. These really take quite a bit of concentration and coordination to do. Toddlers will pick it up eventually, just don’t force it. And they need to really work on their big muscles first with gross motor activities before they start work on the little muscles.  30 fantastic and fun fine motor activities for toddlers:These fine motor activities for toddlers include threading, poking, pinching, tracing and focusing on hand and eye coordination! And they’re all easy enough for toddlers in the 1-3 year old range to do! Have fun!
Want more activities to work on fine motor skills?
 |
| You are subscribed to email updates from Hands On As We Grow®. To stop receiving these emails, you may unsubscribe now. | Email delivery powered by Google |
| Google, 1600 Amphitheatre Parkway, Mountain View, CA 94043, United States | |


No comments:
Post a Comment